Apple Pay Integration guide with Edfapay
Overview
This guide explains how to integrate Apple Pay with EdfaPay on mobile apps and websites. The process involves three steps: generating a certificate, verifying your domain (web only), and submitting the certificate to EdfaPay for backend configuration.
Prerequisites
| Requirement | Description |
|---|---|
| Apple Developer Account | Active account with access to Certificates and Merchant IDs |
| OpenSSL | Installed on your machine for generating keys and CSRs |
| EdfaPay Account | Active merchant account |
| Public Domain | Required for web integrations only |
Mobile vs. Web
| Mobile (App) | Web (Browser) | |
|---|---|---|
| Certificate | Payment Processing | Merchant Identity |
| Key Algorithm | EC (prime256v1) | RSA (2048-bit) |
| Domain Verification | Not required | Required |
Step 1 — Generate Your Certificate
Generate an EC private key:
openssl ecparam -out merchant_private_key.pem -name prime256v1 -genkeyGenerate a CSR:
openssl req -new -sha256 -key merchant_private_key.pem -out merchant_csr.csr \
  -subj "/CN=Apple Pay Payment Processing: EDFAPAY, INC./O=EDFAPAY, INC./C=US"
OandCmust match your Apple Developer Account registration exactly.
Upload the CSR to Apple:
- Log in to the Apple Developer Portal
- Go to Certificates > Merchant IDs > Payment Processing Certificate
- Upload
merchant_csr.csr - Download the generated
apple_pay.cer
Send
apple_pay.certo [email protected]
Step 2 — Domain Verification (Web Only)
Mobile integrations — skip this step.
- Log in to the Apple Developer Portal
- Go to Apple Pay > Merchant ID > Domains
- Add your domain
- Download the verification file
- Host it at:
https://yourdomain.com/.well-known/apple-developer-merchantid-domain-associationApple Pay will not work until this file is publicly accessible. Test the URL first.
Step 3 — Backend Configuration
After you submit your certificate, the EdfaPay team completes the following:
| Task | Description |
|---|---|
| Certificate installation | Certificate is installed on the EdfaPay backend |
| Server-side integration | Apple Pay services are connected to your account |
| Session validation | Merchant session validation is enabled |
You will receive an email confirmation when your integration is live.
Flutter
To configure Apple Pay in Flutter, provide EdfaPay with:
- Apple Developer Account access — for provisioning and certificates
- Xcode project access — for signing and building
Contact [email protected] to coordinate Flutter setup.
Payment Flow
The diagram below shows how a payment moves from the customer through your app or website to EdfaPay and Apple Pay Services.
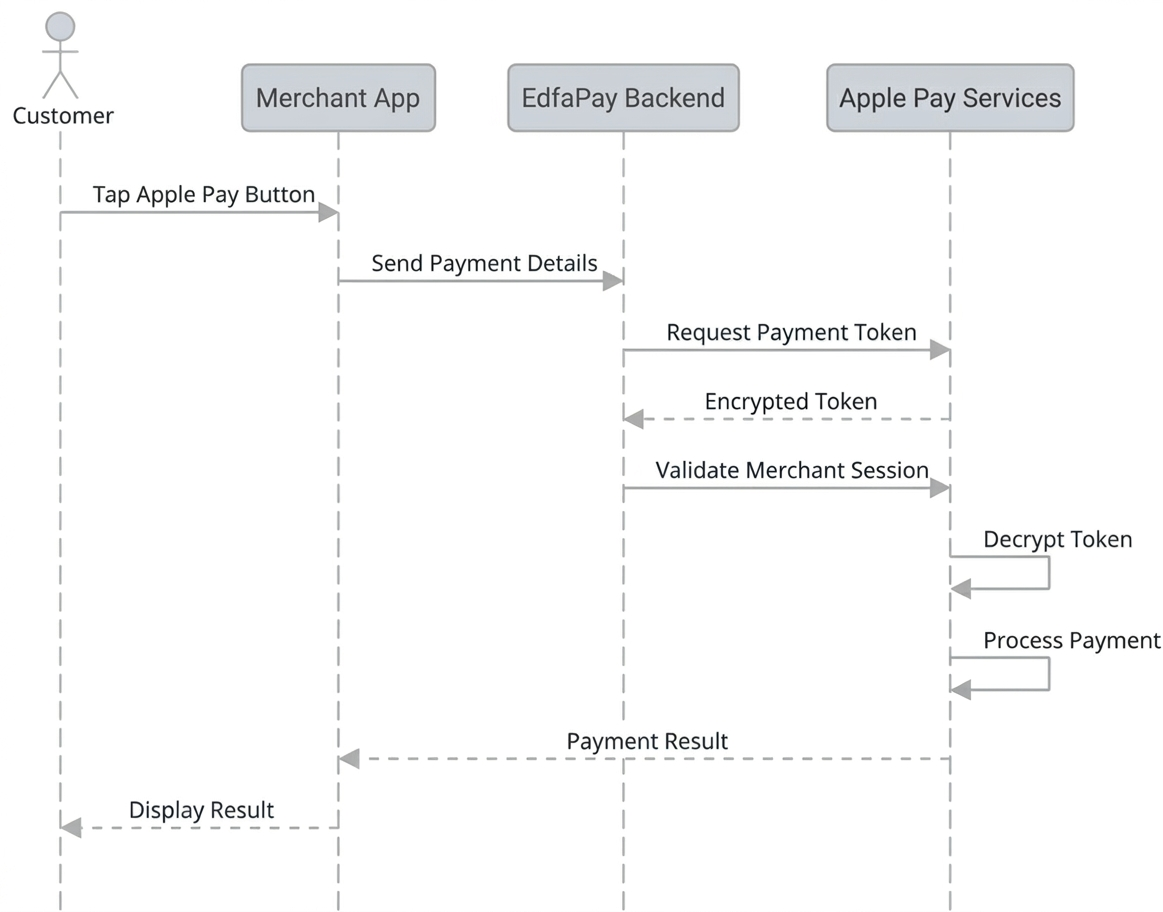
How It Works
| Step | Actor | What Happens |
|---|---|---|
| 1 | Customer | Taps or clicks the Apple Pay button on your app or website |
| 2 | Merchant | Your domain is verified with Apple to confirm the request is legitimate (web only) |
| 3 | App / Website | Your app or website sends the payment details (amount, currency, order ID) to the EdfaPay backend |
| 4 | EdfaPay | EdfaPay connects to Apple Pay Services and generates a secure, encrypted payment token |
| 5 | EdfaPay | EdfaPay validates the merchant session with Apple, decrypts the token, and processes the payment |
Once Step 5 completes, the payment is processed and both the merchant and customer receive confirmation.
Support
For any questions or issues, contact [email protected].
Updated 4 months ago